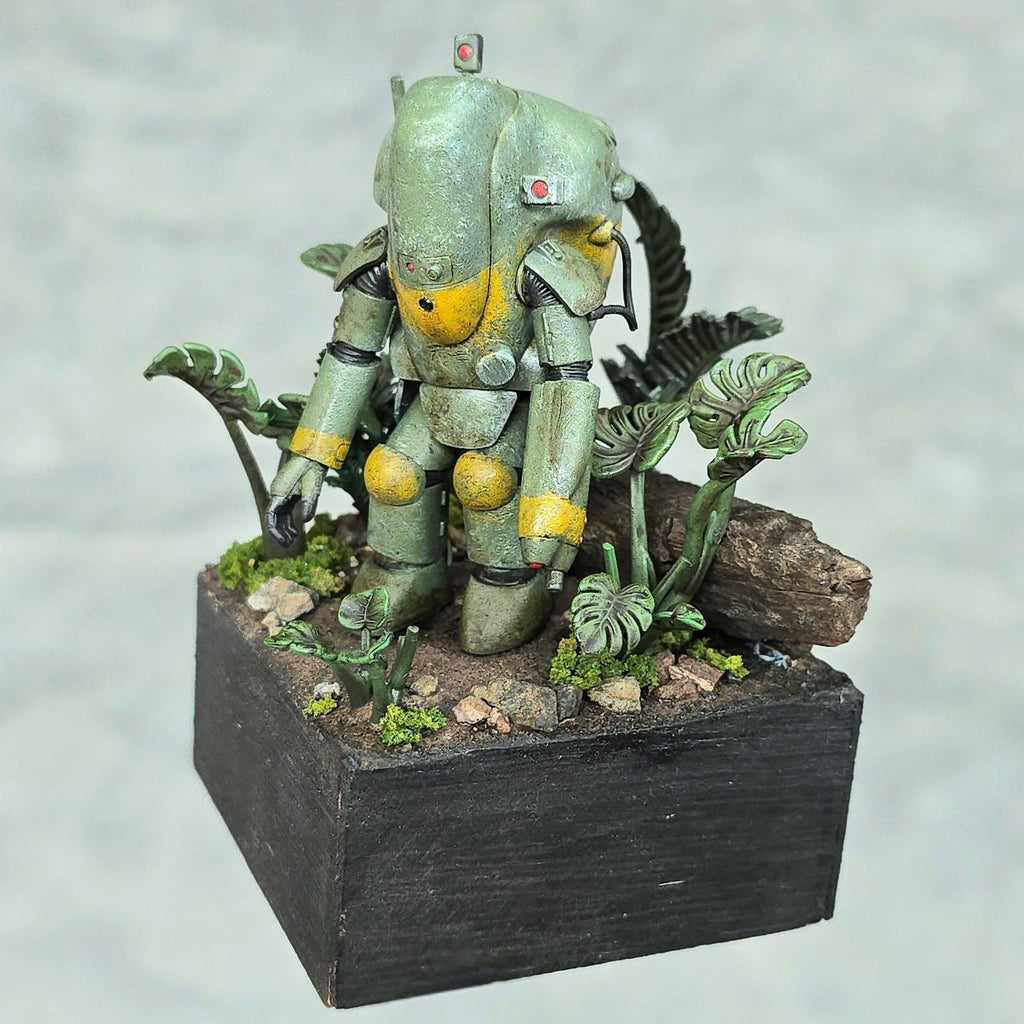
Let's Build the 1/35 Ma.K Melusine!

The Maschinen Krieger universe offers some of the most unique, imaginative and visually rich designs in the scale modelling world. It had been a while since I last built a Ma.K kit so I took on the challenge of building the 1/35 scale Melusine from Hasegawa - a compact yet detailed power suit that's packed with character. For this build, I wanted to deploy some ‘traditional’ Ma.K building and painting techniques.
Building the Kit

The Melusine kit goes together easily, with clean mold lines and solid fit. Assembly was straightforward, but I knew from the start that I wanted to push the finish further with texture and advanced paintwork.
Adding Cast Iron Texture
To simulate the rugged, industrial surface typical of Maschinen Krieger suits, I coated the plastic armour with SMS Extra Thin Cement. The Extra Thin Cement melts and softens the plastic, which then allows for manipulation to create texture. I needed to work fast before it dried, so I stippled the surface with an old, stiff brush to manipulate the softened plastic. This created a subtle, in scale, cast iron texture that looks fantastic once painted and weathered.

Painting
With the texture set, I moved to priming. SMS Surfacer Black laid down beautifully, highlighting all the stippled detail and ensuring maximum paint adhesion for the layers to come.

The first colour on was SMS Olive Drab SCC No.15, providing a solid, military green base tone.

I followed this with SMS RAF Sky, applied in a loose, mottled fashion to break up the surface and then to add tonal variation, was stippled on with a brush around the edges.

To finish off, I stippled on SMS German Olive with a brush, coming back to the ‘traditional’ way of painting Ma.K that I was trying to replicate.

To bring in some visual interest, I masked off sections of the suit for colour banding. Within these areas, I stippled on SMS Marigold to create a warm, weathered yellow band that contrasts against the more subdued greens.

Weathering Effects
The suit wouldn’t look complete without some battlefield wear. Using a fine brush, I applied SMS US Light Gull Grey and Black to simulate chipped paint around high-wear areas. Dirty streaks and panel lining were achieved with the SMS Dark Brown Wash, adding just the right amount of grime without overpowering the base paintwork.
Building the Base
To ground the model (literally and visually), I created a simple diorama base using XPS foam, cut to size and framed with thin veneer board for a clean finish.

For texture, I applied fine sand over the foam using a mix of water and PVA glue. Spraying the area first with isopropyl alcohol helped the glue penetrate and adhere better. Once dry, I painted the surface with various SMS dark brown tones to match the worn, earthy environment of the Melusine.

To bring life to the scene, I added 3D printed plants, painted with SMS green tones and weathered with the SMS Dark Brown Wash for realism. The Melusine was attached using a metal pin inserted into the feet and the foam, giving it stability.

Final Thoughts
This build was a satisfying mix of creative texturing, advanced painting techniques, and storytelling through weathering. Our paints not only delivered the ideal colour and coverage but also held up beautifully through all the layers, stippling, and washes.


If you're looking to take your Ma.K builds to the next level—or just want to experiment with textures and finishes—this kit is a fantastic project to put your hand to. And with the right paints at your side, like those from SMS, it’s easy to bring imagination to reality.
Keep on modelling!
- Scott

