(This article was originally published in Phoenix Scale Modelling Issue #1 in 2022)
INTRODUCTION
The Bushmaster Protected Mobility Vehicle (PMV) was developed in the 1990s for the Australian Defence Force to provide the ADF with an armoured vehicle to transport infantry. Over the years since its inception, the Bushmaster has been used in multiple conflicts, primarily in the Middle East and in the Australasian region.
It is currently used in active service by the Australian Army, Royal Australian Air Force, Royal Netherlands Army, British Army, Japan Ground Self Defence Force, Indonesian Army, Fiji Infantry Regiment, Jamaica Defence Force and the New Zealand Army.
In mid 2021, Dragon Models released a 1/72nd scale Bushmaster which is the focus of this build.
BUILD
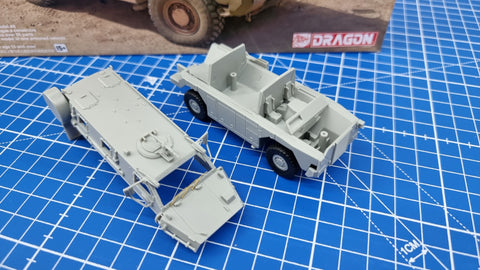
Building the kit itself was very easy. Being in 72nd scale, there wasn’t a large amount of overly complicated parts which meant the build time was only around 45 minutes to get it assembled.

This kit at one stage was designed to be a diecast model, and that was very noticeable when assembling the kit. The design of the chassis, the axles being metal rods and then the lack of rear cabin interior clearly showed the origins of this kit.

Whilst the kit itself is a great build, there were a few parts that were missing from the design and some that needed to be changed to give it a much better feel. First was to replace the windscreen wipers from the plastic ones to the included Photoetch ones. The plastic windscreen wipers are very chunky and way off scale so switching to the Photoetch was a must.
Once that was remedied, I turned my attention onto some other details that needed to be changed on the kit, namely the spare wheel cover, the seats in the cabin and also the lack of a steering wheel.
Using my Anycubic Mono X resin printer, I printed out some newly designed seats, a new steering wheel, and most importantly, a more realistic and natural looking spare wheel cover to replace the flat one included in the kit.


These were attached to the kit and then it was ready to paint!
PAINTING
For the painting, I left the top and bottom sections of the kit separate so I could paint the interior but also leave the windows out until the final assembly steps to remove the need to mask them off.

In our Premium range of Acrylic Lacquers, we have the three colours of the Auscam pattern available in the airbrush ready formula (PL31 Camo Green, PL32 Camo Brown and PL33 Camo Black respectively), but we also produce a special 10ml concentrated version of the same colours. For this build, I used these new versions of our Auscam colours to paint the pattern.
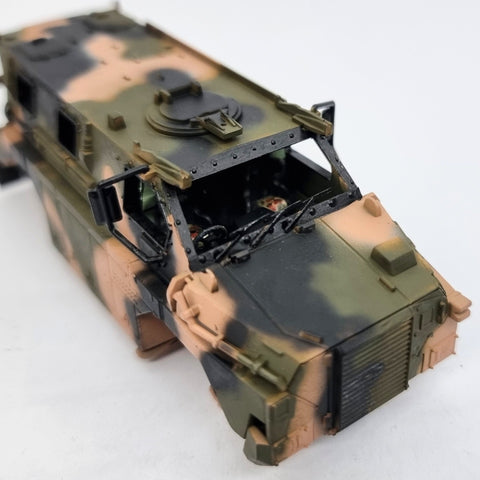
With the Auscam pattern, the references I used were all very similar in pattern style but were ever so slightly different. This fact coupled with the camo edges looking slightly feathered, suggests that these are all painted free hand on the real vehicle. Taking this into account, I decided not to mask off the pattern on the vehicle but in fact do it all freehand.
The painting process started with the entire kit primed using SMS Surfacer Black, sprayed at 15PSI using a 0.3 airbrush.

After about 10 minutes, the model was given the first colour of the Auscam pattern, the Camo Brown. That was left to sit for half an hour or so and then I returned to do the next colour of the pattern, Camo Green. Another half an hour later, the Camo Black was applied.


Now that all the pattern was down, I cross referenced it with the references I had and returned with the Camo Green and Camo Black, both thinned down a little further, to tighten up the camo pattern and fix any imperfections in the pattern.

Once that was completed and I was satisfied with the look, attention was turned to the spare wheel cover and the hexagonal pattern.
For this, I used the Bushmaster Spare Wheel mask sheet that was designed for us by Clayton Ockerby of Workbench Hobbies.

To begin, the wheel cover was base coated with Camo Green first. Using the reference photos again, I lined up the spots that needed masking for the green hexagons and then sprayed on Camo Black. The next patterns were added, again as per the references, and then was painted with Camo Brown.
The pattern on the spare wheel cover also had random dots painted all over it, so once the masks were removed, I applied dots of all three colours matching them to the references as best I could.

For the interior of the driver’s cabin, the seats themselves have a camouflage pattern on them, so with a paint brush, I applied a camo pattern as best I could. The size of the seats and pattern made it difficult, it is just enough that they can be seen through the window and you can notice there is a pattern there. The floors and rear wall sections were painted with Seafoam Green, the paint colour used on interiors of ADF vehicles. The remainder were all painted in black as per the refence photos.

As the windows were being installed, I remembered that they have the ‘bottle green’ look as they are bullet proof glass in real life. To get this effect, I applied a couple of light coats of SMS Clear Green through the airbrush to ever so slightly tint the clear plastic. I needed to be careful with this stage as too much solvent based paint on clear plastic parts can cause the clear plastic to craze and fog. Once that was done and the paint had dried, the windows were all installed and then the top and bottom halves of the model were glued together.
At this stage, I realised that I had forgotten completely to add in the antenna on the sides. I carefully cut away a small section of the mounting points with a sharp blade and then made some rigid antenna using some wire. These were fixed into place using some super glue and then painted in Black.

The final step was to add the decals that were included in the kit. They were applied using Mr Softner decal solution and then it was finally ready for the base to be made.
BASE
The idea of the base was to create something simple to show off the kit but also make it clear in what sorts of situations it would be used in real life.
Using styrene sheeting, I built a rectangular box slightly larger than the model when it was placed on an angle. Whenever I create small based like this, I never like having them flat and boring, so using some off cuts of styrene, some raised areas were created at the rear left corner and the front right corner so give the impression of a well used desert road that the Bushmaster was on.
The entire top was covered with some very fine grit plaster filler which gives the impression of a sandy surface in small scale. The tires of the model were used to create the tracks in the road by rolling them along the surface whilst the plaster filler was still wet. That was all then left to dry and then given a rough sand back to remove any jagged and lumpy areas that would look out of scale.
Using SMS Brown, German Sand Yellow, and IJN Deck Tan, the ground was airbrushed in random patterns to get varying tones in the sand. Using some various SMS Grey colours, small stones were picked out to give some interesting features to the scene and then some dry looking grass tufts were added to simulate some desert grasses.
The model was then glued to the base and then using SMS Dust Weathering Pigment, was given some final weathering to tie it all to the base and give it that dusty look.


CONCLUSION
This kit was a fantastic build from start to finish and whilst it has its shortcomings, these are easily remedied by the modeller with some simple scratch building or 3d printing. If Australian subjects interest you, I thoroughly recommend building this kit.


